Building a Secure Home Network: My Journey from Chaos to Control
So your network is a chaotic mess? Learn how I transformed my flat, vulnerable home network into a secure fortress using OPNsense, Pi-hole, and VLAN segmentation. This guide details the journey from chaos to complete control.

Estimated reading time: 6 minutes
Key Takeaways
- Network Segmentation is Key: Using VLANs to separate trusted devices (laptops, phones) from untrusted ones (IoT, guest devices) is the foundation of a secure home network.
- Centralized Filtering is Powerful: Combining OPNsense for routing and firewall rules with Pi-hole for DNS filtering gives you granular control over all network traffic, blocking ads and malicious domains for every device.
- The "Router-on-a-Stick" Model is Efficient: This architecture is a cost-effective and simple way to implement VLANs in a home environment without needing expensive Layer 3 switches.
- Force Your DNS: Many smart devices try to bypass local DNS servers. Creating a NAT rule to redirect all DNS traffic to your Pi-hole is a critical step to ensure complete filtering.
Table of Contents
- The Main Problem: When Your Smart TV Becomes a Security Risk
- The Solution: Network Segmentation with OPNsense and Pi-hole
- The Architecture: Router-on-a-Stick
- The Three-VLAN Strategy
- Implementation Deep Dive
- Challenges and Lessons Learned
- The Results: What This Setup Achieved
- Hardware Investment
- What I'd Do Differently
- Next Steps
- Bonus Tips
In this post, I will give a taste of how I went from a flat network “nightmare” to a properly segmented, secure homelab setup!
The Main Problem: When Your Smart TV Becomes a Security Risk
Like many of you, my home network started simple. One router, one network, everything connected to 192.168.1.x. It worked... until it didn't.
The wake-up call came when I realized my "smart" TV was phoning home constantly, my IoT devices had questionable security updates, and guests on my network could see my file servers. Meanwhile, ads were slowing down browsing across all devices, and I had zero visibility into what was actually happening on my network.
I needed control. I needed security. I needed to know what was “talking” to what and how.
The Solution: Network Segmentation with OPNsense and Pi-hole
After months of research and planning, I built what I'm calling my "fortress network" which is a segmented, monitored, and filtered home setup that gives me complete control while maintaining ease of use for family members.
The Architecture: Router-on-a-Stick
Here's the physical layout I settled on:
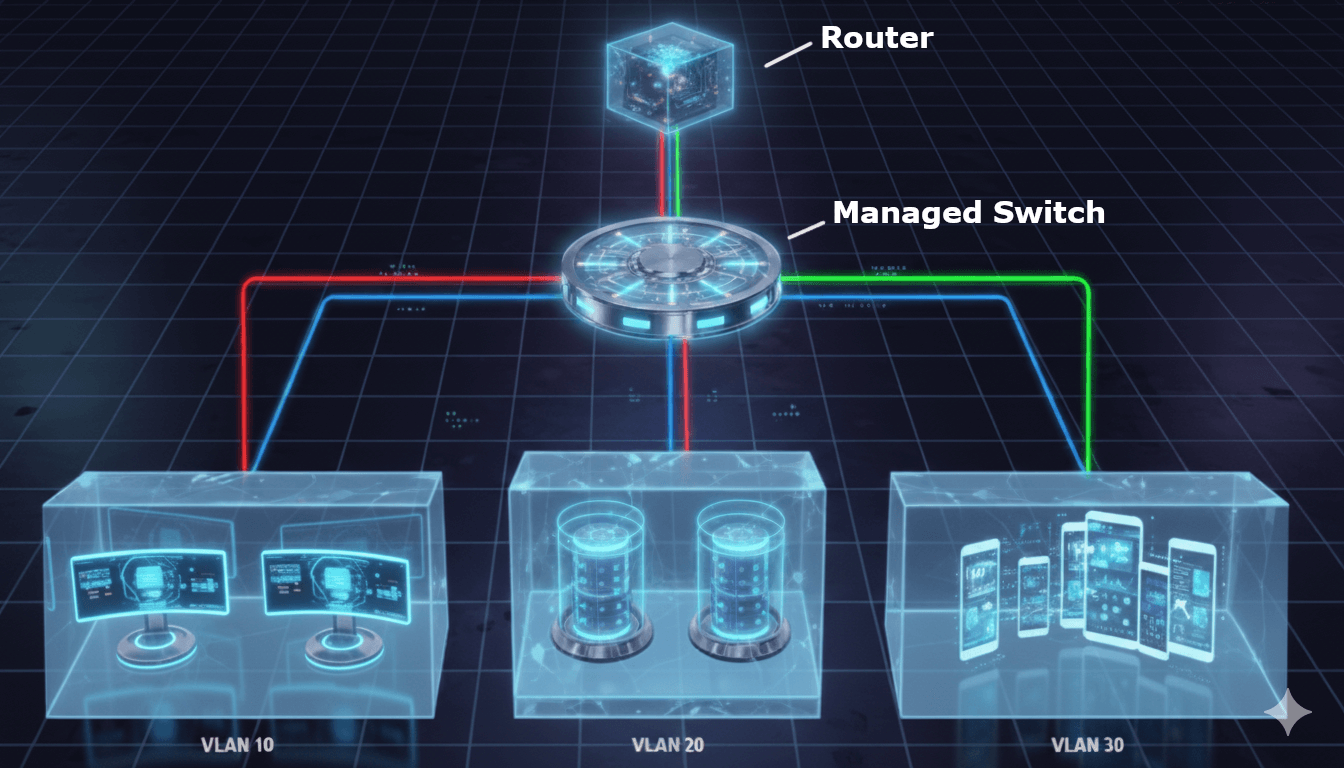
What is "Router-on-a-Stick"?
Think of it as having one super-smart traffic director (the router) connected to a busy intersection (the switch) with a single road. Instead of building separate physical roads for different types of traffic, we use "virtual lanes" called VLANs that all share the same physical connection.
Here's how it works:
- One cable connects your router to your switch (the "stick").
- Multiple VLANs run over that single connection using VLAN tags.
- The router handles all traffic between different network segments.
- The switch distributes traffic to devices based on their VLAN membership.
Why choose this design?
- Simplicity: Only one cable to manage between your router and switch, making installation and troubleshooting easier.
- Cost-effective: You don't need expensive multi-port routers or Layer 3 switches for basic home segmentation.
- Flexibility: Adding new VLANs is just a configuration change - no new hardware required.
The trade-off: All inter-VLAN traffic must flow through that single connection to the router. For most home networks pushing standard internet traffic, this isn't a problem. But if you're constantly moving large files between VLANs (like streaming 4K video from your NAS to multiple devices), you might hit bandwidth limits. If you have a 1 Gigabit connection but need to push more than 1 Gigabit between VLANs simultaneously, you'll max out that single link.
The solution would be a Layer 3 switch that can route between VLANs internally, but for most home scenarios, router-on-a-stick is perfect.
The Three-VLAN Strategy
I divided my network into three distinct segments. The security model is simple: Trust decreases as VLAN numbers increase.
| VLAN | Purpose | Subnet | Trust Level |
|---|---|---|---|
| USERS (10) | Personal devices | 192.168.1.0/24 | High - Full access |
| IOT (20) | Smart home devices | 192.168.20.0/24 | Low - Internet only |
| GUESTS (30) | Visitor devices | 192.168.30.0/24 | Minimal - Internet only |
My laptop can access IoT devices to manage them, but IoT devices can't reach back into my trusted network.
Implementation Deep Dive
OPNsense: The Security Brain
I chose OPNsense over pfSense for its modern UI and active development, plus I like to use truly open-source software. The configuration focuses on:
Firewall Rules (The Magic):
- USERS network: Can access everything, including IoT management.
- IOT/GUESTS networks: Internet-only access, no inter-VLAN communication.
- DNS enforcement: All DNS traffic redirected to Pi-hole, no exceptions.
Key Services:
- DHCP server for each VLAN
- Unbound DNS as Pi-hole's upstream resolver
- Automatic outbound NAT for internet access (you can use Hybrid or Manual setup, but things will get more complex if you choose so).
Forced DNS: No Escape from Pi-hole
Here's where I learned a crucial lesson: devices lie about DNS. Many IoT devices ignore DHCP-provided DNS settings and try to use hardcoded servers like 8.8.8.8 (Google DNS). The solution is NAT redirection rules that intercept ALL port 53 traffic from IoT and Guest networks and redirect it to Pi-hole.
Your smart TV wants to bypass my DNS filtering? Not happening.
Rule: If (source = IOT/GUESTS) AND (destination port = 53) AND (destination ≠ Pi-hole), Then: Redirect to Pi-hole (192.168.1.x)
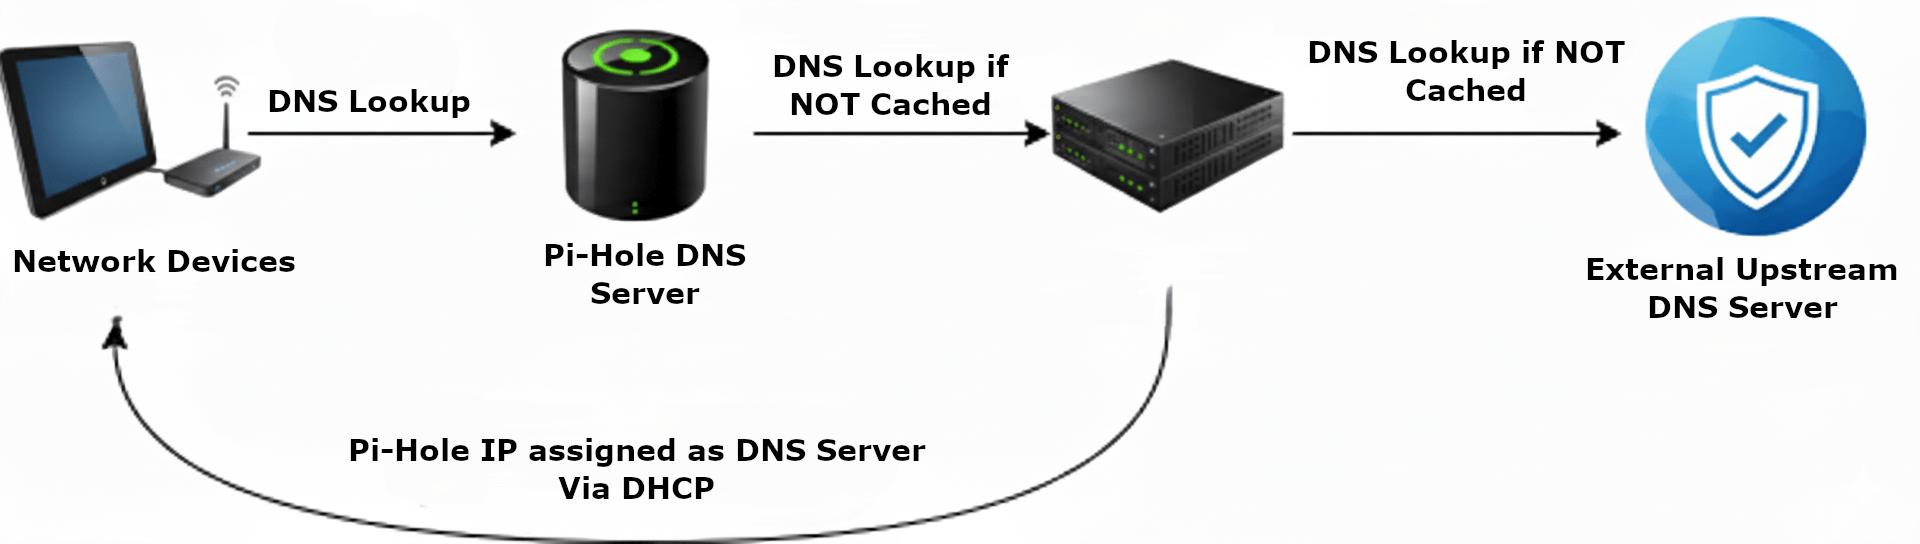
Pi-hole: The Network's Conscience
Pi-hole sits on the trusted USERS network (192.168.1.x) and serves as the DNS filter for the entire house. Every DNS query flows through it, providing:
- Ad blocking across all devices (including mobile apps!)
- Tracking protection
- Query logging for network visibility
- Custom blocking for problematic domains
Challenges and Lessons Learned
- Challenge 1: The VLAN Trunk Mystery. Spent hours wondering why VLANs weren't working. Solution: The switch port connecting to OPNsense must be configured as a trunk port, not an access port. Rookie mistake, but it happens!
- Challenge 2: IoT Device Discovery. Some IoT devices need to be "discovered" by apps on your phone, but they're on different VLANs. Solution: Temporary firewall rules during setup, or using VPN to connect your phone to the IoT VLAN when needed.
- Challenge 3: Family WiFi Complexity. Multiple SSIDs confused family members. Solution: I created intuitive names: "Home" (USERS), "Smart-Devices" (IOT), and "Guests" (GUESTS). Clear naming helps adoption.
- Challenge 4: Performance Paranoia. Worried about adding latency with multiple hops. Reality: Zero noticeable performance impact. Modern hardware handles this easily.
The Results: What This Setup Achieved
Security Wins
- IoT isolation: My smart TV can't see my NAS.
- Guest protection: Visitors can't access internal resources.
- DNS visibility: I can see exactly what's calling home.
- Forced filtering: No device can bypass Pi-hole.
Quality of Life Improvements
- Faster browsing: Network-wide ad blocking.
- Better troubleshooting: Clear network segments make diagnosis easier.
- Compliance: Some work-from-home policies require network segmentation.
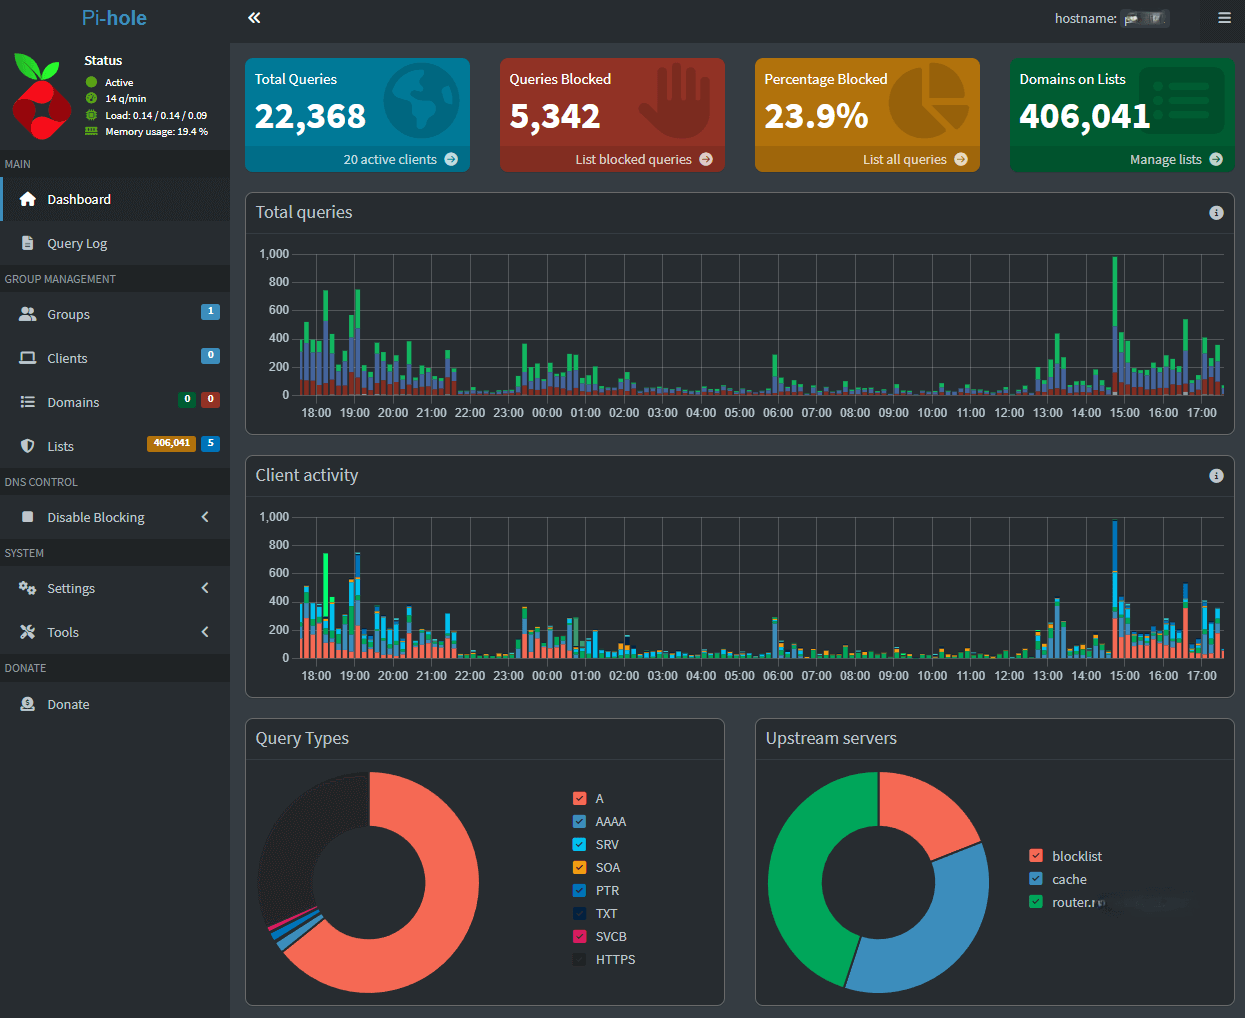
Monitoring Insights
Pi-hole revealed some shocking statistics:
- 20 to 30% of all DNS queries were ads/trackers.
- My smart TV made 200+ DNS requests per day.
- Some IoT devices were incredibly chatty.
Hardware Investment
The total cost was surprisingly reasonable. The ROI in better security, network visibility, and ad blocking across all devices was worth every penny.
- OPNsense Mini PC: ~300€ (Powertech N1141-J6412)
- Managed Switch: ~100€ (8-port with VLAN support)
- Access Point: ~80€ (With VLAN Support)
- Pi-hole hosting: 0€ (existing Proxmox server)
What I'd Do Differently
- Start with fewer VLANs: Three is plenty. I initially planned five and overcomplicated things.
- Document as you go: I wish I'd kept better notes during the migration process.
- Test thoroughly: Have a rollback plan. I learned this when I briefly broke internet access for the whole house (more than once).
- Consider the family: Make sure the changes don't impact daily usage for non-technical family members.
Next Steps
This network foundation enables future projects:
- Network monitoring with tools like LibreNMS (free and open source)
- Home automation with proper IoT segmentation
- Lab environment isolation for testing
Bonus Tips
Secure your Wi-Fi with a strong password. Choose a password that's at least 16 characters long and includes a mix of letters, numbers, and symbols. This combination will provide robust protection for your network.
You don't need to break the bank for quality equipment. Shop second-hand markets to find top products at lower prices. Always check seller reviews before buying, and be patient—the right deal will come along. (I personally purchased all of my equipment from Insomnia .)
For detailed setup guides and tutorials, check out Home Network Guy - it's packed with useful resources for home networking projects.